Sa invatam sa crosetam si sa tricotam

Sa invatam sa crosetam si sa tricotam

Crosetatul si tricotatul sunt indeltniciri foarte vechi.


Modelele sunt concepute sau preluate de la batranii nostri si se adreseaza tuturor persoanelor cu experienta in arta crosetatului si tricotatului dar mai ales incepatorilor.

"DE LA LUME ADUNATE SI-NAPOI LA LUME DATE"
myassy1980@yahoo.com
Se afișează postările cu eticheta pulover tricotat copii. Afișați toate postările

luni, 13 noiembrie 2017

Pulover Baieti, Boy Sweater Knitting


Using DK yarn and 3 mm needles ~
This raglan sweater for babies is knit from the top down and is entirely seamless
Size
Fits babies about 2 years.

Gauge
24 sts and 36 rows = 4" with larger needles over pattern stitch


Materials
1 ball sportweight yarn such as Bernat Softee Baby
Size 3.25 mm straight needles (circular needles),(double points)
2 stitch holders
stitch markers
tapestry needle

Instructions
Work Back and forth:

Pattern:
Row 1 (Right side): p1 * knit 1, purl 2; repeat from * to end.
Row 2: Knit 1, * slip 1 with yarn in front, knit 2; repeat from * to end.


Abbreviations:

K2tog= knit 2 stitches together; ridges=2 rows , k all stitches, 


Cast on 84 sts.
Beginning at collar, with straight needles CO 88 sts. 
Rows 1 : *k1, p1*; rep from * to end.
Rows 2 : *p1, k1; rep from * to end.
Repeat Rows 1 and 2 more times,

Next Row (RS): Rep Row 1, working a buttonhole in band at beginning of row for boys (k2, yo, k2tog, k1) or at end for girls (k1, k2tog, yo, k2). Work buttonholes every 12th ridge or 24 rows.

Next row (WS): Beginning Pattern and placing markers as follows: 
Work 14 sts for front, pm,1 st, pm, work 14 sts for sleeve, pm, 1 st, pm, work 28 sts for back, pm, 1 st, pm, work 14 sts for sleeve, pm, 1 st, pm, work last 14 sts for front.
Change to circular needles, working back and forth as if with straights. 
Begin yoke and raglan increases. Increase by knitting into the front and back of same stitch.

On the back of the work, we were working row 2 in the pattern without making increases between markers.

Next row (RS): Front, sl1, p1 * knit 1, purl 2*; repeat from * to marker, inc 1 st, marker, K 1, slip marker, inc 1 st; Sleeve: rep from * to marker, inc 1 st, marker, K 1, slip marker, inc 1 st,  Back : rep from * to marker, inc 1 st, marker, K 1, slip marker, inc 1 st; Sleeve rep from * to marker, inc 1 st, marker, K 1, slip marker, inc 1 st; Frontrep from * to end. (96 sts).


Rep last four rows for pattern stitch until you have 54 sts for each sleeve (20 ridges ), ending with WS completed-592 sts total.


Join body and put sleeves on holder.
(RS): *Work to within 2 sts of marker, inc in next st, K1, remove marker. Put 54 sts of sleeve on holder without working. CO 4 sts at underarm. Remove next marker, inc in next st; rep from * once and complete row - 136 sts
Work even, continuing in pattern stitch and repeating buttonholes at the proper interval. End with 3rd row of pattern stitch, 8 ridges below the 4th buttonhole.

Bottom Band
Change to smaller straight needles.
WS: K5, *p2, k2; rep from 8 to last 5 sts, k5
Continue in ribbing and working buttonbands as for collar, knitting 5th buttonhole at proper interval.
Work 4 rows after buttonhole, then BO loosely in pattern.
Sleeves
With larger double points, k 42 sts from holder and pick up 6 sts from underarm (the 4 CO sts, plus an extra st at each end of CO sts). Divide 15 sts on needle 1, 18 sts on needle 2, 15 sts on needle 3 - 48 sts
Begin at underarm, dec and join:
Rnd 1: K5, k2tog, k to the last st, K it together with the 1st stitch from the beginning of next round - 46 sts
Rnd 2: K
Rnd 3: K
Rnd 4: P
Rnd 5: K4, k2tog, k to the last st, K it together with the 1st stitch from the beginning of next round - 44 sts
Rnd 6: K
Rnd 7: K
Rnd 8: P
Rnd 9: K3, k2tog, k to the last st, K it together with the 1st stitch from the beginning of next round - 42 sts
Work even over 42 sts as established in pattern stitch until sleeve measures 4" or desired length. End with p rnd completed.
*K2tog, k5; rep from * around - 36 sts
Change to smaller double points and work in k2, p2 ribbing for one inch. BO loosely.
Rep for second sleeve.
Sew on buttons. Weave in ends on WS.

miercuri, 6 septembrie 2017

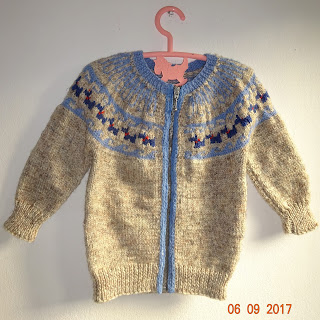
Baby Cardigan Pattern

Baby Cardigan Pattern


Size: 24 months.
Finished Measurements:  24” chest circumference

Gauge: 6 stitches and 8 rows = 1” in stockinette
Requirements:  
- Circular or straight needles, size 3.75 mm Double-pointed needles, size 3.75 mm (optional) ;
- Sport weight yarn : MC (300-450 yards), secondary colors A (less than 100 yards), B, and C (less than 50 yards each) ;
MC= light brown
 A= blue
B=navy blue
C= red
- Two stitch holders.;
- zipper;
- Tapestry needle;

Abbreviations used in this pattern:

m1 (make one stitch (one increase)): my favorite way to make a stitch is to lift up and knit the right leg of the stitch one row below the stitch on the left needle.  Another option is to pick up the bar between stitches and knit it through the back loop.

 K = knit
P = purl
RS = right side
WS = wrong side
PM = place marker
SSK = slip two stitches knitwise, then knit these two stitches together through the back loops
K2tog = knit two stitches together

Directions: 
Yoke 
With MC, cast on 85 stitches. 
Work 7 rows of k1, p1 ribbing. 
Work one row purl. Switch to A and work two rows stockinette. In next row, increase  20 stitches evenly across row as follows: k 4, *m1, k 4, rep. from * 18 times, m1, k 5.   ( 105 st.) 
Work 1 more row stockinette. In next row, increase 28 stitches evenly across row as follows: k 12, *m1, k3, rep. from * 26 times, m1, k 12.   ( 133) st. 
 Body 
In next RS row, divide for sleeves as follows: 
knit to first marker, place stitches between first and second markers on a holder or piece of scrap yarn, knit to third marker, place stitches between third and fourth markers on a holder or piece of scrap yarn, knit to end. 
You can drop the markers in this row.  
Continue body in stockinette until it measures  11 inches from cast-on. 
Then work 12 rows of k1, p1 rib and bind off. 
Sleeves 
Place one sleeve’s stitches back on needles and rejoin MC yarn. 
Work back-and-forth or in the round.  
If you work back-and-forth, cast on one selvedge stitch at each side to use for seaming up later. 
Work 12 rows stockinette. 
In next row/round (RS), k1, ssk, work to 3 stitches before end, k2tog, k1. 
Work 11 more rows/rounds. 
Repeat these 12 rows/rounds 3 more times. 
Work  8 more rows/rounds stockinette. 
Sleeve should be  7 inches from armpit. 
If it is not, continue in stockinette until it is.  
In next row/round, *k4, k2tog, repeat from * to end.  
Work 8 rows k1, p1 rib and bind off. 
Repeat with other sleeve. 

Sew openings under sleeves. 


sâmbătă, 10 mai 2014

Pulover tricotat baieti 1-2 ani - Knitting Sweater Boys 12-24 month


Kids wool pullover size chart
1 an/year
2 ani/year
3 ani/year
4-5ani/ year
6 ani/ year
7-8 ani/year

cm / in
cm / in
cm / in
cm / in
cm / in
cm / in
Circumferinta bustului (A)
59 / 23.6
64 / 25.6
68 / 27.2
72 / 28.8
77 / 30.8
81 / 32.4
Lungimea puloverului (B)
20 / 8
22 / 8.8
24 / 9.6
26 / 10.4
28 / 11.2
30 / 12
Lungimea manecii pana la subrat (C)
22 / 8.8
24 / 9.6
26 / 10.4
28 / 11.2
30 / 12
32 / 12.8


Materials:
- yarn - fire - King Cole Merino Blend DK Wool 300-350 gr (50g approx 112 metres, 100% pure new wool)
- 3 mm and 3,5 - circular knitting needles  (andrele circulare de 3 si 3.5 mm)
- stitch marker;
- marker.
- buttons 5.

ABREVIERI - ABBREVIATIONS
K= knit = ochi pe fata;
P= purl= ochi pe dos;
Kfb= knit in the front and knit in the back of the same stitch,= in acelasi ochi , tricotam 2 ochiuri, unul pe fata, unul pe dos; 
SSK= slip- slip- knit,= tricotam imreuna doua ochiuri de la stanga spre dreapta, rezulta un singur ochi; 
k2tog= knit two together= tricotam imreuna doua ochiuri de la dreapta spre stanga, rezulta un singur ochi;  
sts= stitches = ochi
C6BCable 6 back: put next 3 stitches on cable needle at back of work, knit 3, knit the 3 from the cable needle.­­­­­­­­­­.= sarim trei ochiuri pe care le lasam in asteptare pe un stitch marker,in spatele lucrului,  lucram pe fata urmatoarele 3 ochiuri, apoi luam cele 3 ochiuri aflate in asteptare si le lucram tot pe fata. 
C6F1. Slip the next 3 stitches onto the cable needle,
2. Hold the cable needle in front of the work,
3. Knit the next 3 stitches from the left hand needle onto the right hand needle.
4. Then knit the stitches from the cable needle onto the right hand needle.
.= sarim trei ochiuri pe care le lasam in asteptare pe un stitch marker,in fata lucrului,  lucram pe fata urmatoarele 3 ochiuri, apoi luam cele 3 ochiuri aflate in asteptare si le lucram tot pe fata. 
Kfb= increase 1 st (in acelasi ochi tricotam 2 ochiuri)
MC= culoare principala
WS= spatele lucrului
RS= fata lucrului

Cast on 82 stitches by using US#4 (3.5 mm) needle. Montam 82 ochiuri pe ace de 3 mm, lucram gulerul , k1, p1, apoi schimbam andrelele cu cele de 3.5 mm.

Row 1:(WS) *(p1, k1), repeat between*, end with p1.
Row 2:(RS) *(k1, p1), repeat between*, end with k1.
Repeat Row 1 and 2 up to Row 20.
Row 21:(WS) change to US#6 (4 mm) needle.= k8, p10, place marker, p10, place marker, p26, place marker,p10, place marker, p10, k8.
Row 22:Slip all markers from Row 22. (RS) k5, p3, k to last 8 sts, and Kfb before and after markers, p3, k5. (90 sts).
Repeat this increasing method (Kfb before and after markers) to every marker for every right side row.
Row 23:k8, p to last 8 sts, k8.
Row 24:k5, p3, C6B, k to last 14 sts, and Kfb before and after markers, C6B, p3, k5. (98 sts).
Row 25:k8, p to last 8 sts, k8.
Row 26: k5, p3, k to last 8 sts, and Kfb before and after markers, p3, k5. (106 sts).
Row 27: k8, p to last 8 sts, k8.
Row 28: k5, p3, k3, C6F, k to last 17 sts. And Kfb before and after markers, C6F, k3, p3, k5. (114 sts)
Row 29: k8, p to last 8 sts, k8.
Row 30:k5, p3, k12, p1, Kfb before and after markers and knit through last marker, p1, k12, p3, k5, (132 sts).
Row 31: k8, p12, k2, p to last 22 sts, k2, p12, k8.
Row 32: k5, p3, C6B twice, p2, k to last 22 sts,  Kfb before and after markers, p2, C6B, p3, k5, (140 sts).
Row 33:k8, p12, k3, p to last 23 sts, k3, p12, k8.
Row 34: k5, p3, k12, p3, k to last 23 sts, and Kfb before and after markers, p3, k12, p3, k5. (148 sts).
Row 35: k8, p12, k3, p to last 23 sts, k3, p12, k8.
Row 36: k5, p3,k3, C6F twice, k3, p3, k to last 23 sts, and Kfb before and after markers, p3, k3,  C6F, k3, p3, k5, (156 sts).
Row 37: k8, p12, k3, p to last 23 sts, k3, p12, k8.
Row 38: k5, p3, k12, p3, k to last 23 sts, and Kfb before and after markers, p3, k12, p3, k5.(164 sts)
Row 39: k8, p12, k3, p to last 23 sts, k3, p12, k8.
Row 40: k5, p3,C6B twice, p3, k to last 23 sts, and Kfb before and after markers, p3, C6B twice, p3, k2, yo, k2tog, k1. (172 sts). (1st button hole)
Row 41: k8, p12, k3, p to last 23 sts, k3, p12, k8.
Row 42: k5, p3, k12, p3, k to last 23 sts, and Kfb before and after markers, p3, k12, p3, k5.(180 sts)
Row 43: k8, p12, k3, p to last 23 sts, k3, p12, k8.
Row 44: k5, p3, k3, C6F,k3, p3,  k to last 23 sts, and Kfb before and after markers, p3, k3, C6F, k3, p3,  k5.(188 sts)
Repeat Row  37 to Row 44 (2) more times up to Row 60.
For Row 48 and 56 , k5 only for last 5 sts. (Do not make button holes.)
For Row 60, ( k2, yo, k2tog, k1) instead of  (k5) for last 5 sts. ( Make 2nd button hole)
Divide body and sleeves
Row 61: k8, p12, k3, p to first marker, remove marker, place 50 sts on a holder or leftover yarn, remove marker, p to third marker, remove marker , place 50 sts on a holder or leftover yarn, remove marker, p to last 23 sts, k3, p12, k8. (142 sts on the needle).
Row 62: k5, p3, k12, p3, k to last 23 sts, p3, k12, p3, k5.
Row 63: k8, p12, k3, p to last 23 sts, k3, p12, k8.
Row 64: k5, p3, C6B twice, p3, k to last 23 sts, p3, C6B twice, p3, k5.
Row 65: k8, p12, k3, p to last 23 sts, k3, p12, k8.
Row 66: k5, p3, k12, p3, k to last 23 sts, p3, k12, p3, k5.
Row 67: k8, p12, k3, p to last 23 sts, k3, p12, k8.
Row 68: k5, p3, k3, C6F, k3, p3, k to last 23 sts, p3, k3, C6F, k3, p3, k5.
Repeat Row 61 to 68    (6)  more times to reach Row 116.
For Rows 80 and Row 100 , knit ( k2, yo, k2tog, k1) instead of  (k5) for last 5 sts. ( Make 3rd  and 4th  button holes)
Change to US#4 (3.5 mm) needle. Rows 117-119 : k5, *(k2, p2), repeat * to last 5 sts, k5.
Row 120: k5, *(k2, p2), repeat * to last 5 sts, k2, yo, k2tog, k1. (5th  button hole
Rows 121-124: k5, * (k2, p2), repeat * to last 5 sts, k5.
Bind off knitwise to knit sts and purlwise to purl sts.
Sleeves
Pick up stitches from a holder to US#6 (4 mm) three DPNs evenly.
Picking up plus 4 sts from cast on  underarms to avoid any gap. (2 sts on 1st DPN and 2 sts on 3rd DPN)
Tie yarn at the middle of underarm to knit in the round.
Rounds 1-6: k around (54 sts)
Row 7 : SSK, k to last 2 sts, k2tog. (52 sts)
Repeat Round 1 to 7 (6) more times to reach round 49.
There will be total of 40 sts left on the needles.
Change to US#4 (3,5 mm) DPNs. Rounds 50-59 : (K2, p2) around. (40 sts)
Bind off knitwise to knit sts and purlwise to purl sts, weave in the ends and fix five small buttons at the proper places.


marți, 3 septembrie 2013

Pulover tricotat baieti

Pulover tricotat baieti

Marimea: 2-3 ani;
Materiale:
- ace circulare si ace cu 2 varfuri de 4 mm;
- fire din lana, 200 gr. (50 gr=100 m)
- markere.
- ac de cusut;
- fermoar.
Proba de ochiuri:
la 4 cm lungime/ 10 cm latime = 9 ochiuri /17 ochiuri

Abrevieri:
- k=knit (ochi pe fata);
- p=purl (ochi pe dos);
- M1 = increase 1 st -lift bar between sts from front to back, k1tbl  (inmultim 1 ochi);
- CO= cast-on =The Provisional Cast-On ( montarea ochiurilor)
http://www.youtube.com/watch?v=VkX5PR9GRK8
- sts - ochiuri.
- row(s) = rand (uri) ;
- st st = se lucreaza  un rand pe fata , un rand pe dos;
- 4 - st - LC = make Cable: Slip 2 stitches purlwise to cable stitch holder and hold in the front of the work; knit next 2 stitches from double pointed needle; knit the 2 stitches from the holder  (primele 2 ochiuri le lasam pe un stitch marker in fata lucrului, lucram urmatoarele 2 ochiuri pe fata, apoi , luam cele 2 ochiuri aflate in asteptare si le lucram tot pe fata).
- RS = Right side  (fata lucrului);
- WS= Wrong side (spatele lucrului).
NOTA:
Modelul :

Puloverul se tricoteaza de la gat in jos, intr-o singura piesa.
Cu un centimetru , masuram circumferinta gatului.

Circumferinta gatului =28 cm
Prin regula de 3 simple stabilim numarul de ochiuri ce corespund celor 28 cm.
Daca la 10 cm.......avem 17 ochiuri
La 28 cm .................. x
X= 47,6             aproximativ 48 ochiuri

Impartim cele 48 ochiuri astfel:
Fata stg 8 sts—maneca stg 8 sts- spate 16 sts-  maneca dr. 8 sts - Fata dr 8 sts   
Pentru inceput montam pe andrea 38 ochiuri, dupa metoda " The Provisional Cast-On ", apoi ,
continuam astfel:
R1: Fata stg 2 sts - 1 st - maneca stg 8 sts    - 1 st   - spate 14 sts- 1 st  -   maneca dr. 8 sts  - 1 st  - Fata dr 2 sts  = 38 STS
R3: Fata stg , 1M, 2 K - 1M,  1 st, 1M – maneca stg , 8k , 1M, 1 st , 1M  , spate 14 k,  1M  - 1 st, 1M -  maneca dr 8 K  - 1M - 1 st, 1M   -Fata dr 2 K, 1M  = 48 STS
R5: Fata stg , 1M, 4 K - 1M,  1 st, 1M – maneca stg , 10 k , 1M, 1 st , 1M  , spate 16 k,  1M  - 1 st, 1M -  maneca dr 10 K  - 1M - 1 st, 1M   -Fata dr 4 K, 1M  = 58 STS
R7: Fata stg , CO 3 sts, 6 K - 1M,  1 st, 1M – maneca stg , 12 k , 1M, 1 st , 1M  , spate 18 k,  1M  - 1 st, 1M -  maneca dr 12 K  - 1M - 1 st, 1M   -Fata dr 6 K, CO 3 sts  = 72 STS
R9: Fata stg , 10 K - 1M,  1 st, 1M – maneca stg , 14 k , 1M, 1 st , 1M  , spate 20 k,  1M  - 1 st, 1M -  maneca dr 14 K  - 1M - 1 st, 1M   -Fata dr 10 K= 80 STS
R11: Fata stg , 11 K - 1M,  1 st, 1M – maneca stg , 16 k , 1M, 1 st , 1M  , spate 22 k,  1M  - 1 st, 1M -  maneca dr 16 K  - 1M - 1 st, 1M   -Fata dr 11 K  = 88 STS
R13: Fata stg , 12 K - 1M,  1 st, 1M – maneca stg , 18 k , 1M, 1 st , 1M  , spate 24 k,  1M  - 1 st, 1M -  maneca dr 18 K  - 1M - 1 st, 1M   -Fata dr 12 K  = 96 STS
R15: Fata stg , 13 K - 1M,  1 st, 1M – maneca stg , 20 k , 1M, 1 st , 1M  , spate 26 k,  1M  - 1 st, 1M -  maneca dr 20 K  - 1M - 1 st, 1M   -Fata dr 13 K = 104 STS
R17: Fata stg , 14 K - 1M,  1 st, 1M – maneca stg , 22 k , 1M, 1 st , 1M  , spate 28 k,  1M  - 1 st, 1M -  maneca dr 22 K  - 1M - 1 st, 1M   -Fata dr 14 K  = 112 STS
R19: Fata stg , 15K - 1M,  1 st, 1M – maneca stg , 24 k , 1M, 1 st , 1M  , spate 30 k,  1M  - 1 st, 1M -  maneca dr 24 K  - 1M - 1 st, 1M   -Fata dr 15 K  = 120 STS
R21: Fata stg , 16 K - 1M,  1 st, 1M – maneca stg , 26 k , 1M, 1 st , 1M  , spate 32 k,  1M  - 1 st, 1M -  maneca dr 26 K  - 1M - 1 st, 1M   -Fata dr 16 K  = 128 STS
R23: Fata stg , 17 K - 1M,  1 st, 1M – maneca stg , 28 k , 1M, 1 st , 1M  , spate 34 k,  1M  - 1 st, 1M -  maneca dr 28 K  - 1M - 1 st, 1M   -Fata dr 17 K  = 136 STS
R25: Fata stg , 18 K - 1M,  1 st, 1M – maneca stg , 30 k , 1M, 1 st , 1M  , spate 36 k,  1M  - 1 st, 1M -  maneca dr 30 K  - 1M - 1 st, 1M   -Fata dr 18 K  = 144 STS
R27: Fata stg , 19 K - 1M,  1 st, 1M – maneca stg , 32 k , 1M, 1 st , 1M  , spate 38 k,  1M  - 1 st, 1M -  maneca dr 32 K  - 1M - 1 st, 1M   -Fata dr 19 K  = 152 STS
R29: Fata stg , 20 K - 1M,  1 st, 1M – maneca stg , 34 k , 1M, 1 st , 1M  , spate 40 k,  1M  - 1 st, 1M -  maneca dr 34 K  - 1M - 1 st, 1M   -Fata dr 20 K  = 160 STS
R31: Fata stg , 21 K - 1M,  1 st, 1M – maneca stg , 36 k , 1M, 1 st , 1M  , spate 42 k,  1M  - 1 st, 1M -  maneca dr 36 K  - 1M - 1 st, 1M   -Fata dr 21 K  = 168 STS
R33: Fata stg , 22 K - 1M,  1 st, 1M – maneca stg , 38 k , 1M, 1 st , 1M  , spate 44 k,  1M  - 1 st, 1M -  maneca dr 38 K  - 1M - 1 st, 1M   -Fata dr 22 K  = 176 STS
R35: Fata stg , 23 K - 1M,  1 st, 1M – maneca stg , 40 k , 1M, 1 st , 1M  , spate 46 k,  1M  - 1 st, 1M -  maneca dr 40 K  - 1M - 1 st, 1M   -Fata dr 23 K  = 184 STS
R37: Fata stg , 24 K - 1M,  1 st, 1M – maneca stg , 42 k , 1M, 1 st , 1M  , spate 48 k,  1M  - 1 st, 1M -  maneca dr 42 K  - 1M - 1 st, 1M   -Fata dr 24 K  = 192 STS
R39: Fata stg , 25 K - 1M,  1 st, 1M – maneca stg , 44 k , 1M, 1 st , 1M  , spate 50 k,  1M  - 1 st, 1M -  maneca dr 44 K  - 1M - 1 st, 1M   -Fata dr 25 K  = 200 STS
Randurile cu sot: p
Separam manecile de fata si spate. Ochiurile de la maneci le punem in asteptare pe un st marker (44 x 2).
In continuare, lucram fata si spatele impreuna -112 sts.
Intre fata si spate adaugam cate 2 ochiuri stanga si 2 ochiuri dreapta. Vom avea 116 sts.
MODELUL 14 sts,  88k, MODELUL 14 sts = 116 sts
Continuam sa lucram pe ace circulare de 4 mm, fata si spatele impreuna,  54 rows in st st.

La randul 30 , impartim ochiurile pentru buzunare .
Row 30(RS): 14 sts pattern, cast off 13 sts,  k62, cast off 13 sts, 14 sts pattern .
Realizam buzunarele dupa urmatorul model:
http://www.youtube.com/watch?v=7Vp1k-2EvmY
 un buzunar= 13 sts si 18 randuri
Row 31: 14 sts pattern, cast on 13 sts,  k62, cast on 13 sts, 14 sts pattern

Urmatorul rand:
Cu cele 13 oc aflate pe stitch marker lucram terminatia buzunarului, dupa modelul “Attached i-Cord (cc)”
http://www.youtube.com/watch?v=uGpPgxdFqoE
Apoi, continuam puloverul , dupa terminarea buzunarelor si tricotam 12 rows in rib (k1, p1) (elasticul).
Fasten off.

Manecile:
Avem 44 sts . Ridicam 2 ochiuri stanga si 2 ochiuri dreapta. 
Avem acum 48 sts.

Scadem cate un ochi stanga si un ochi dreapta, la 4 randuri,  pana ajungem la lungimea dorita.
Incheiem cu 6 randuri de elastic (k1 , p1).

sâmbătă, 6 aprilie 2013

Pulover tricotat baby, Knitted Sweater Baby Pattern

Baby Knitted Sweater

                          Marimea
3-6 luni
6-9 luni
9-12 luni

Material utilizat : fire din 75% lana, 25 % acril, 50 gr= 160 m:
-          Pulover;
-          Boneta ;


3
1


4
1


4
1


gheme
Circumferinta pieptului
46
18,2
48
18,9
51
20,2
Cm
Ins.
Lungimea spate si fata

28
11
29
11,4
30,5
12
cm.
ins.

Lungimea manecii (interior, pana la axila)
17
6,6

18
7
19
7,4
cm.
ins.
Lungimea totala a manecii, exterior , pana la umar
21
8,2
24
9,4
27
10,6
cm.
ins.
Circumferinta gatului
22
8,6
24
9,4
26
10,2
cm.
ins

Boneta
26,5
10 ,5

28,5
11,2
30,5
12
cm.
ins.


ABREVIERI:
- k= ochi pe fata;
- p= ochi pe dos;
- sc2 ochiuri= scadem 2 ochiuri, primul ochi se ia nelucrat, urmatoarele 2 ochiuri se lucreaza impreuna, pe fata, ochiul nelucrat se trece peste cele 2 ochiuri lucrate impreuna ;
- sc1 ochi= lucram 2 ochiuri impreuna, pe fata, introducem andreaua dreapta prin cele 2 ochiuri, prin fata lucrului , de la dreapta spre stanga, luam firul si-l scoatem prin cele 2 ochiuri. Rezulta un singur ochi;
- sc1 ochi dr=lucram 2 ochiuri impreuna , pe fata, rasucite. Introducem andreaua dreapta, prin cele doua ochiuri de la stanga spre dreapta , prin fata lucrului, luam firul si-l scoatem prin cele 2 ochiuri, rezultand unul singur.
NOTA: Tricotam impreuna fata si spatele , de jos in sus (spre gat).
Montam pe andrea 193 (204) ochiuri.
Tricotam 6 randuri  ochiurile numai pe fata, dupa care, modelul A:

Pattern A / Modèle A

R1:k6; *K3, sc1 ochi , jeteu , k1, jeteu,  sc1 ochi dr , k2, repetam intre * pana la ultimele 7 ochiuri, k7;
R2 si toate randurile pe dos: k6, p, pana la ultimele 6 ochiuri, k6;
R3: k6, “k2, sc1 ochi , (k1, jeteu ) x2 ori, k1,  sc1 ochi dr , k1” , repetam de la * pana la ultimele 7 ochiuri, k7;
R5: k6, * k1, sc1 ochi , k2, jeteu , k1, jeteu , k2, sc1 ochi dr , repetam de la *  pana la ultimele  7 ochiuri, k7;
R7: k6, sc1 ochi ,  * k3,   jeteu , k1, jeteu , k3, sc2 ochiuri , repetam de la * pana la ultimele  15 ochiuri, k3,  jeteu , k1, jeteu , k3, sc1 ochi dr , k6  ;
R9: k7, * jeteu , sc1 ochi dr , k5, sc1 ochi ,  jeteu , k1, repetam de la *  pana la ultimele 6 ochiuri, k6;
R11: k7,*   jeteu , k1, sc1 ochi dr , k3, sc1 ochi , k1,  jeteu , k1,  repetam de la *  pana la ultimele 6 ochiuri , k6;
R13: k7,*   jeteu , k2, sc1 ochi dr , k1, sc1 ochi , k2,  jeteu , k1,  repetam de la *  pana la ultimele 6 ochiuri, k6;
R15: k7,*   jeteu , k3, sc2 ochiuri , k3, jeteu , k1,  repetam de la *  pana la ultimele 6 ochiuri , k6;
R16: k6, p pana la ultimele 6 ochiuri, k6;
Repetam ultimele 16 randuri de 3 ori.
Pentru marimea 51 cm , lucram inca 8 randuri.
Ambele dimensiuni:
R urmator : k6 (6), *sc1ochi, k5* repetam intre * pana la ultimele 6 ochiuri. k6.  (158, 178 sts)

R urmator (tricotam butoniera):k3, sc2oc, k1, p pana la ultimele 6 ochiuri, k6.
Dupa 10 randuri tricotam urmatoarea butoniera si dupa alte 10 randuri , ultima butoniera.
R urmator :k6, (k4, p2) repetam pana la ultimele 6 ochiuri, k6. 
R urmator :k6, (p4, k2) repetam pana la ultimele 6 ochiuri, k6. 
Repetam ultimele 2 randuri de 2 ori.
R urmator:  k6, (primele 2 ochiuri le lasam in asteptare pe o andrea ajutatoare, k2, apoi, lucram cele 2 ochiuri aflate in asteptare, tot pe fata,  p2) repetam pana la ultimele 6 ochiuri, k6.
R urmator:  k6, (p4, k2) repetam pana la ultimele 6 ochiuri, k6. 


Ambele marimi - Rascroiala manecii
Impartim ochiurile :
Avem :158 ochiuri total(fata si spatele)- 6 ochiuri bentita din mijloc= 152: 4=38 ochiuri
Fata stg= 38 ochiuri +3 oc,
Fata dreapta= 38 oc +3 oc,
Spatele= 76 oc
Fata stg- 38+3.....76 oc -spate.....fata dr.-38+3
Rascroiala manecii:
R urmator: k6, (k4, p2)x5, k3 , scadem 4 ochiuri, (k4, p2)x12 , scadem 4 ochiuri,  (k4, p2)x5, sc1 oc, k1, k6;  
R urmator k6, (p4, k2)x5, p3 , scadem 4 ochiuri, (p4, k2)x12 , scadem 4 ochiuri,  (p4, k2)x5, p2, k6;  
Ne intoarcem  si tricotam separat, mai intai , spatele, apoi,  cele 2 parti ale fetei. Ultima , este fata cu butonierele.
Modelul cu torsadele, B, se intinde pe 50 randuri. 
Randul 44,  incepem rascroiala gatului.
R urmator:scadem 5 ochiuri din bentita, modelul cu torsade pana la sfarsitul randului;
R urmator: tricotam ochiurile asa cumcere modelul;
R urmator: scadem 2 oc, apoi, continuam modelul cu torsade.
R urmator: tricotam ochiurile asa cum cere modelul.


Repetam ultimele 2 randuri de 3 (4) ori.
Lucram la fel si partea cealalta a fetei.

Spatele
R urmator: scadem 2 ochiuri stanga si dreapta iar la centru se respecta modelul torsadelor (k4, p2); 
R urmator: tricotam ochiurile asa cum cere modelul.
Repetam cele 2 randuri cu respectarea torsadelor din 8 in 8 randuri.
Incheiem

Continuam ...cu manecile.
Montam pe andrea 48 ochiuri.
Primele 8 randuri : ochiurile pe fata;
Randul 9: 2 ochiuri fata,  crestem 1 ochi, 2 ochiuri fata, crestem 1 ochi, urmatoarele ochiuri pe fata pana la ultimele 4 ochiuri..... crestem 1 ochi, 2 ochiuri fata, crestem 1 ochi, 2 ochiuri fata.(52 ochiuri).
Randul 10: toate ochiurile pe fata.
Tricotam 16 randuri,   modelul A.
Randul 16: 2 ochiuri pe dos, crestem 1 ochi , 2 ochiuri pe dos,  crestem 1 ochi , toate ochiurile pe dos pana la ultimele 4 ochiuri.... crestem 1 ochi , 2 ochiuri pe dos,  crestem 1 ochi , 2 ochiuri pe dos.(54 ochiuri).
Repetam Modelul A  (16 randuri).
Randul urmator: 2 ochiuri pe fata, crestem 1ochi, 2 ochiuri pe fata, crestem 1 ochi, toate ochiurile pe fata  pana la ultimele 4 ochiuri ...... crestem 1ochi, 2 ochiuri pe fata, crestem 1 ochi, 2 ochiuri pe fata. (56 ochiuri).
Urmatoarele 9 randuri, le tricotam ,alternativ , pe dos , apoi, pe fata.
Continuam....
R urmator : scadem 5 ochiuri, apoi, toate ochiurile pe fata;
R urmator : scadem 5 ochiuri, apoi, toate ochiurile pe dos:
*R urmator : scadem 2 ochiuri, apoi, toate ochiurile pe fata;
R urmator : scadem 2 ochiuri, apoi, toate ochiurile pe dos;*
Repetam cele 2 randuri intre *de 2 ori.
Urmatoarele 2 randuri , pe fata apoi, pe dos.
Continuam sa scadem la inceputul fiecarui rand, cate (3 ochiuri stanga si 3 ochiuri dreapta)x2, apoi 4 ochiuri stanga si 4 ochiuri dreapta, 5 ochiuri stanga si 5 ochiuri dreapta.
Incheiem toate ochiurile ramase, coasem si prindem  manecile de puloverul propriu-zis .

ENGLISH / FRENCH - FRANCAIS


                          Marimea
3-6 luni
6-9 luni
9-12 luni
Materials used : yarn 75% wool, 25 % acryl, 50 gr= 160 m:
-          Pullover;
-          Boneta ;


3
1


4
1


4
1


balls
Chest circumference,
Tour de poitrine
46
18,2
48
18,9
51
20,2
Cm
Ins.
Length back and face,
Longueur avant et arrière,
28
11
29
11,4
30,5
12
cm.
ins.
Sleeve length, inside,
Longueur des manches (interne à l'aisselle)
17
6,6
18
7
19
7,4
cm.
ins.
The total length of sleeve, external to the shoulder,
Longueur des manches (interne à l'aisselle)
21
8,2
24
9,4
27
10,6
cm.
ins.
Neck Circumference,
Tour du cou
22
8,6
24
9,4
26
10,2
cm.
ins
Bonnet,
Boneta
26,5
10 ,5
28,5
11,2
30,5
12
cm.
ins.


NOTA:
Knitting together the front and back, from the bottom up (to the neck).
Tricoter ensemble l'avant et à l'arrière, de bas en haut (vers la gorge).
Back and Fronts  (worked  in one piece to armholes).
Using 3,5 mm needles. Avec les aig. 3,5 mm monter...
1.      CO  /  Le montage des mailles au tricot   - 193 (213) sts / des mailles
2.      8 rows garter stitch / Le point mousse ou de jarretière - Il est obtenu en tricotant à l'endroit chaque maille de chaque rang.
3.      Pattern A / Modèle A ( Les ogives )  
    - Pattern A

R1:k6; *K3, K2tog, jeteu (y.fwd), k1, jeteu, k2tog tbl, k2, repet from * to last 7 sts, k7;

R2 si toate randurile pe dos: k6, p, to last 6 sts, k6;

R3: k6, “k2, k2tog, (k1, y.fwd) twice, k1, k2tog tbl, k1” , repetam de la * to last 7 sts, k7;

R5: k6, * k1, k2tog, k2, yfwd, k1, yfwd, k2, k2tog tbl, repet from * to last 7 sts, k7;

R7: k6, k2tog,  * k3,  yfwd, k1, yfwd, k3, sl1, k2tog, psso, repet from * to last 15 sts, k3, yfwd, k1, yfwd, k3, k2tog tbl, k6  ;

R9: k7, * yfwd, k2tog.tbl, k5,k2tog, yfwd, k1, repet from * to last 6 sts, k6;

R11: k7,*  yfwd, k1,k2tog.tbl, k3,k2tog, k1, yfwd, k1, repet from * to last 6 sts, k6;

R13: k7,*  yfwd, k2,k2tog.tbl, k1,k2tog, k2, yfwd, k1, repet from * to last 6 sts, k6;

R15: k7,*  yfwd, k3, sl1, k2tog, psso, k3, yfwd, k1, repet from * to last 6 sts, k6;

R16: k6, p to last 6 sts, k6;
Repet the last 16 rows 3 times more.

For size 51 cm , still working 8 rows.

Both numbers:

Next row (dec.row.): k11 (6), *k2tog, k5* repet from * to* 11 (13) times, k2tog, k13 (15), repet from * to * 12 (13) times, k6 (k2tog, k6)  (169, 185 sts)

Work 3 rows  g.st.

Next row (Buttonhole row):k3, yfwd, k2tog, k to end.

Work 3 rows g.st.

Next row: knit

Next row: k6, p to last 6 sts, k6;

for 51 cm - stop here.

For larger sizes, repet the last 2 rows once more.

Both sizes - neckline sleeve

Next row: k40 (42) for Right Front , cast off 8 (12)sts, k73 (77) for Back, cast off 8 (12)sts, k40 (42) for Left Front.

Left Front

Next row : k6, p to end;

Next row : k2tog.tbl, kto end;

Repeat the last 2 rows  3 times more.

Next row: knit

Next row : k2tog.tbl, kto end;

Repet the last 2 rows  3 times more.

Commencing on a p row. Continue in st.st dec 1 st at armhole edge as before and working 6 border stgs in  g.st. until 27 (28) sts remain.

Shape neck

Next row : k6, p 4 (5), sl these 10 (11) sts onto a safety  pin , p to end;

Continue in stst dec 1 st at each end of the needle on the next and every following alt. Row until 3 sts remain.

Work 1 row.

Next row : sl1, k2tog, p sso;

Fasten off

Back

Next row  (WS): p to end;

Next row : k2tog.tbl, k to last 2 sts,k2tog;

Repet the last 2 rows 3 times more.

Next row : k to end;

Next row : k2tog.tbl, k to last 2 sts,k2tog;

Repet the last 2 rows 3 times more.

Continue in stst dec 1 st at each of the needle as before until 31 (33) sts  remain.

Work 1 row.

Slst onto a st holder . Break of yarn.


Right front

Next row (WS): p to last 6 sts, k6;

Next row : k to last 2 sts, k2tog;

Repet the last 2 rows 3 times more.

Next row  : knit;

Next row  : k to last 2 sts, k2tog;

Next row  : knit;

Next row  (buttonhole) : k3, yfwd, k2tog, k to last 2 sts, k2tog;

Repet the last 2 rows twice more, omitting buttonhole.

Continue in stst dec. At armhole edge as before and working the 6 border sts.in g.st until 28 (29) sts remain.

Work 1 row.


 Shape neck

Next row : k10 (11), sl these sts onto a safety pin, k to last 2 sts, k2tog;

Next row : purl;

Continue in stst dec 1 st at each of the needle on the next and every following alt.row until 3 sts remain.

Work 1 row.

Next row : sl1, k2tog, psso;

Fasten off.


    - Modèle A ( Les ogives )   6 mailles ( Le point mousse ou de jarretière );   
Les ogives
             Nombre de mailles     Multiple de 8, +5        
             Rgs 1 et 3        1end, *1 jeté, (tricotez 2 m ens à l'env en prenant les boucles par-derrière, remettez sur l'aig gauche la m obtenue, rabattez la maille suivante sur celle-ci et reprenez la sur l'aig droite), 1 jeté, 5end*, 1 jeté, 1dim double, 1 jeté, 1end
             Rgs 2 et pairs              env
             Rg 5    1end, *3end, 1 jeté, 1 surjet simple, 1end, 2ens end, 1 jeté*, 4end
             Rg 7    1end, *1 jeté, 1 dim double, 1 jeté, 1end, 1 jeté, 1 dim double, 1 jeté, 1end.
Répétez 8 dernières rangées de 6 fois.Pour la taille de 51 cm, travailler 8 autres lignes.
Deux dimensions:
La ligne suivante : 6 maille endroit  (6), *diminuer1maille,  5 maille endroit * répéter entre *jusqu'à la dernière 6 maille ......  6 maille endroit .  (158, 178 maille)

La ligne suivante  (boutonnière tricot): 3 maille endroit , diminuer 1 maille 1maille endroit 1, 1 maille envers jusqu'à la dernière 6 maille ......  6 maille endroit .
Après 10 rangs en ​​tricot boutonnière prochaine et après un autre 10 fois, la dernière boutonnière.
La ligne suivante :   6 maille endroit  (6) , Modèle B 6 maille endroit  (6)

Modèle B : La Torsade simple
             Nombre de mailles      Multiple de 7, +3        
             Rgs 1 et 3        *3env, 4end*, 3env 
             Rgs 2, 4, 6       *3end, 4env*, 3end 
             Rg 5    *3env, glissez 2m sur l'aiguille auxiliaire avant, tricotez 2m end, tricotez à l'end les 2m en attente*, 3env.

COASEREA NASTURILOR (Button sewing)