Sa invatam sa crosetam si sa tricotam

Sa invatam sa crosetam si sa tricotam

Crosetatul si tricotatul sunt indeltniciri foarte vechi.


Modelele sunt concepute sau preluate de la batranii nostri si se adreseaza tuturor persoanelor cu experienta in arta crosetatului si tricotatului dar mai ales incepatorilor.

"DE LA LUME ADUNATE SI-NAPOI LA LUME DATE"
myassy1980@yahoo.com

vineri, 8 noiembrie 2013

AMY doll

Amy Doll
Designed by Yvonne Boucher
Gauge:
26 stitches to 4 inches on size 3 needles
5-1/2 stitches to 1 inch on size 6 needles

Materials:
Doll: 3 ounces worted weight yarn in color of your choice
Sacque and booties: 1 skein knitting worsted in color of your choice
Diaper: 1/2 ounce white
Hair: 1 pre-cut sheet of craft fur. If you cannot find craft fur you can find fake fur by the yard in fabric stores. Choose one with long fur and a soft backing.
Face: scraps of black, pink and rose + 1-3/4 yards of 1/8 inch satin ribbon
Knitting needles U.S. size 3 and 6
Polyester fiberfill
Yarn needle and darning needle with large eye (Yarn needle will not go through stuffing)
2 small safety pins for diaper
Sewing needle and thread to match fur color

Abbreviations:
K = knit
sts = stitches
P = purl
tog = together
inc = increase

Doll:

Body (corpul): Cast on 48 stitches on size 3 needles. Beginning with a purl row, stockinette 31 rows.


Decrease for neck: (K 2 tog) Repeat across row. Beginning with a purl row, stockinette 3 rows.

Increase for head: (Inc in every st) Repeat across row (48 sts)

Head: Beginning with a purl row, stockinette 23 rows.

Shape top of head: (K 4, K 2 tog) across row. Purl
(K 3, K 2 tog) across row. Purl
(K 2, K 2 tog) across row. Purl
(K 1, K 2 tog) across row. Purl
(K 2 tog) across row

Cut yarn leaving a long tail to sew back seam of doll. Thread tail through yarn needle and pass through stitches remaining on needle removing them on to tail. Pull up tight to close hole. Sew back seam of doll being careful to match increase and decrease rows at neck. Stuff doll very firmly. The head should measure 12 inches around. When doll is stuffed center back seam and overcast cast on stitches at bottom of doll. Before closing the last little hole add more stuffing to fill in corners. Weave about a 20 inch length of face color yarn through center row of neck. Pull up tight. Wrap end around neck and again, pull up tight. Finish off and bury ends in doll. Tip: Use your darning needle to put yarn ends through doll.

Face: Mark position of eyes with pins. Thread a darning needle with a length of black yarn. Put through head bringing needle and yarn out at one eye position. Put needle through face 2 stitches directly above first stitch and come out at first stitch. Pull yarn through. You have completed one stitch. Repeat 2 times for a total of 3 stitches. Repeat for other eye. Fasten off.

Nose: Using pale pink, make small, horizontal stitch for nose.

Mouth: With rose yarn make a longer horizontal for mouth. Make a second smaller stitch under the first one for bottom lip. Fasten off.

Hair: Cut a circle 6½" in diameter out of fur. Cut only the backing, not the fur. With needle and thread sew a running stitch all the way around. Pull up stitches to gather. Arrange gathers evenly. Put on doll's head and pull up gathers to fit. Sew to head using whip stitch. As you sew, pull wig cap to stretch and make snug. Brush "hair" and arrange as you like.

Legs: With face color and size 3 needles, cast on 16 stitches.
Next row: Inc in every st. (32 sts). Starting with a purl row, stockinette 5 rows.
Next row: K 8, (K 2 tog) 8 times, K 8
Next row: Purl
Next row: K 8, (K 2 tog) 4 rimes, K 8 (20 sts).
Next row: Purl
Next row K 1, inc in next st, k to last 2 sts, inc in next st, K 1 Purl
Next row: K 1, inc in next st, K to last 2 sts, inc in next st, K 1
Beginning with a purl row, stockinette 9 rows.
Next row: K1, K 2 tog twice, K to last 5 sts, K 2 tog twice, K 1.
Next row: Purl
Next row: K 1, inc in first st, K to last 2 sts, inc in next st, K 1
Next row: Purl
Repeat these two rows until there are 24 sts on needle. End with a purl row. Stockinette 9 rows. Bind off.
Stuff leg very firmly. Stuff last half inch lightly so doll will sit. Over cast bound off sts.

Knee: Thread darning needle with a length of face color yarn. Pinch leg to determine where you want knee. Put yarn through at that point going straight through to other side of leg. Go over one strand of yarn (so yarn won't pull through when tightened) and go back through leg to starting point. Pull yarn ends until you have the amount of shaping that pleases you. Tie in knot and put ends through doll's leg.

Make second leg in the same way. Neatly sew seam across top of each leg to seam across bottom of doll.

Arm: (Make 2) With face color cast on 10 stitches. Purl
Next row: Knit 1, inc in next st, knit 2, inc in next st, inc in next st, knit 2, inc in next st, knit 1
Next row: Purl
Next row: Knit 1, inc in next stitch, knit to last 2 stitches, inc in next stitch, knit 1
Starting with a purl row, stockinette 3 rows
Next row: (Knit 2, knit 2 tog) Repeat across row. Purl
Next row: (Knit 3, inc in next stitch) Repeat across row. (15sts) Starting with a purl row, stockinette 21 rows.
Next row: Knit 2 together to last stitch, K 1
Cut yarn leaving a long tail. Thread through stitches remaining on needle. Do not pull up tight at this point. Starting at hand, gather cast on stitches and pull tight. Sew arm seam. Stuff firmly. Pull up stitches at top of arm, gathering tightly and closing hole. Fasten off.
To join arms to body follow diagram. Pull arms tightly against body so they will stay in place.


Sweater: With sweater color and size 6 needles, cast on 52 stitches. Knit 2 rows.
Next row: K 3, *YO, K 2 tog*. Repeat from * to * to last 3 stitches. End YO, K3
Next row: Knit
Dividing row:: K 10 for front, place marker, K 8 for sleeve, place marker, K 17 for back, place marker, K 8 for sleeve, place marker, K 10 for front.
Next row: Knit across row increasing before and after each marker. Slip markers as you come to them.
Next row: K 3, purl to last 3 sts slipping markers as you go, K 3.
Continue to increase before and after each marker, being sure to keep the first and last three stitches in garter stitch, until you have 117 stitches on needle. End with purl row.
Next row: Knit across stitches of left front and place on length of yarn to hold. Knit across sleeve stitches. Place stitches of back on yam holder, stitches of right sleeve on yarn holder and stitches of right front on yarn holder.

Sleeves: Now working on left sleeve only, *cast on 2 sts. Purl across row.
Next row: Cast on 2 sts. Knit across row.
Next row: Starting with a purl row, stockinette 9 rows.
Garter stitch (Knit every row) 4 rows. Bind off loosely.**
Put stitches of second sleeve on needle. Knit 1 row. Repeat directions From * to ** Sew sleeve seams.

Body: Attach yarn to sleeve edge of left front. Pick up 4 sts under left sleeve. knit across stitches of back, pick up 4 sts under right sleeve, knit across right front. Starting with a purl row, stockinette 12 rows remembering to keep first and last 3 stitches in garter stitch.. Garter stitch 4 rows. Bind off loosely. Weave a 36" length of ribbon through beading at neck of sweater. Put on doll. Tie bow in front. Trim ribbon ends to desired length.

Bootie: With bootie color cast 26 stitches on size 6 needle. Garter stitch (Knit every row) 10 rows.
Next row: K 11, (K 2 tog) twice, K 11
Next row: K 10, (K 2 tog) twice, K 10
Next row: Knit
Next row: (Knit 4, inc in next st) across row. End knit 2. (26 sts)
Next row: Start K 1, P 1 rib. Rib for 1-1/2 inches Bind off loosely in rib. Overcast back seam and bottom of booties. Cut a 9" length of ribbon and tie in bow. Sew bow to front of bootie. Turn down cuff and slip on doll's foot. Repeat for other bootie.

Diaper: With white and size 6 needles, cast on 40 stitches. Knit 1 row. Purl 1 row.
Next row: K1, K 2 tog, K to last 3 sts, K 2 tog, K 1
Next row: Purl.
Repeat these two rows until there are 14 sts on needle. End with purl row.
Next row: Knit
Next row: Purl
Next row: K 1, inc in first stitch, knit to last 2 sts, inc in next stitch., K 1
Next row: Purl
Repeat these two rows until there are 32 stitches on needle. End with a purl row.
Next row: Knit Bind (cast) off.
Put diaper on doll. Bring back tabs around and overlap front. Pin.

Blanket: If you wish to make a blanket for your baby use any favorite pattern or if you choose, use this old pattern based on a washcloth design. Using the combination of needles and yarn you like, cast on 4 stitches. Knit 1 row. Then K 2, YO, knit across row. Repeat this row until blanket is the sixr you want. Then K 1, K 2 tog, YO, KI 2 tog, knit to end of row. Repeat this row until you have 4 stitches on needle. Knit 1 row even and bind off.

luni, 14 octombrie 2013

Pulover norvegian

Pulover norvegian

Materiale:
- lana 100%-50gr= 130m 700 gr.
- andrele 3 mm;
- stitch marker;
The Pattern is here : on Craftsy....  The Top Down Icelandic Sweater
http://www.craftsy.com/class/the-top-down-icelandic-sweater/129

luni, 7 octombrie 2013

Iepuri crosetati si tricotati

Iepuri , ursi, vulpi, crosetati si tricotati
These beautiful designs are purchased here:
Craftsy, Etsy:


Candy’ Bear
Candy is a little baby polar bear who makes her way down to Mary Jane’s TEAROOM


Red fox by Twins
http://www.twinsknit.blogspot.com/


Three Knit Lambs by Lorraine Pistorio

http://www.craftsy.com/pattern/knitting/toy/three-knit-lambs/48200


Caciula tricotata copii - Children Knitted Hat

Caciula tricotata copii - Children Knitted Hat


MATERIALS:
-          Yarn phildar Quietude (100 gr= 180 m)- 50% wool, 50% acrylic
-      5 double pointed Needles  US 3  (3, 25 mm) or size needed to obtain  gauge(also you can use circular  needles).
-      Stitch marker.
Gauge
 12 sts / 19 rows = 5 cm/ 5 cm (2””/ 2”)       
      SIZE:
-          6-12 months (16” head circumference= approx 42 cm);
-          12 – 24 months (18” head circumference= approx 45 cm)
-          6-12 months (20” head circumference= approx 50,8 cm)
ABBREVIATIONS
-          BO = bind off
-          ch(s) = chain(s)
-          CO = cast on
-          cont = continu(e)(s)(ing)
-          dbl = double
-          dec = decreas(e)(s)(ing)
-          dpn(s) = double pointed needle(s)
-          k = knit (ochi pe fata)
-          k2tog = knit 2 together (2 ochiuri lucrate impreuna pe fata, rezulta unul singur)
-          p2tog = purl 2 together  (2 ochiuri lucrate impreuna pe dos, rezulta unul singur)
-          lp(s) = loop(s)
-          M1 = make 1 (inmultim 1 ochi)
-          ndl(s) = needle(s)
-          p = purl  (ochi pe dos)
-          pat = pattern
-          Pm = place marker
-           PU = pick up  (ridicam...... ochiuri)
-          rem = remain(s)(ing)
-          rep = repeat(s)(ing)
-          rnd(s) = round(s)
-          RS = right side
-          sl st = slip stitch
-          slip1-k1-psso = slip 1, knit 1, pass slip stitch over (primul ochi il luam neluacrat, tricotam urmatorul pe fata, ochiul nelucrat se trece peste cel lucrat, rezulta un singur ochi)
-          sm = slip marker
-          yfwd= yarn forward (jeteu)
NOTE
It is knitted in the round.
You can change colors as you prefer.Also you can make it with other yarn
Se lucreaza circular pe ace cu varf dublu de 3,25 mm. Lucram separat caciula de marginea cu feunzele. apoi desfacem firul provizoriu , repunem ochiurile pe ac si incheiem 
CO 102 ochiuri (by Provisional Cast-On)
http://www.youtube.com/watch?v=3OGG0AiJ3XE

Lucram in continuare 11-12 cm, circular, numai pe fata, dupa care , incepem sa scadem (shape crown).

Co=102 sts ( Provisional Cast-On ) -   work in st st, or in round with 3 mm dpn needle , 11-12 cm   16x6=96
Then, continue with....

SHAPE CROWN
Row 1: (k15,ssk) x 6;  
 Rows 2,4,6,8,10,12,14,16, 18,20,22,24,26,28,30: k;
Row 3: (k14,k2tog) x 6;  
Row 5: (k13, k2tog) x 6;  
Row 7: (k12, k2tog) x 6;  
Row 9: (k11, k2tog) x 6;  
Row 11: (k10k, k2tog) x 6;  
Row 13: (k9, k2tog) x 6;  
Row 17: (k8, k2tog) x 6;  
Row 19: (k7, k2tog) x 6;  
Row 21: (k6, k2tog x 6;  
Row 23: (k5, k2tog) x 6;  
Row 25: (k4, k2tog) x 6;  
Row 27: (k3, k2tog) x 6;  
Row 29: (k2, k2tog) x 6;  
Row 31: (k1, k2tog) x 6;
Row 32: k6;  
Row 33: I- cord (6 sts)- 4 rows;  

Hatband pattern
Using larger needles cast on 8 sts.
Row 1: k5sts, yfwd, k1, yfwd, k2sts; (10sts)
Row 2: p6sts, inc, k3sts; (11 sts)
Row 3: k4sts, p1, k2sts, yfwd, k1, yfwd, k3sts; (13sts)
Row 4: p8sts, inc, k4sts ;(14 sts)
Row 5: k4sts, p2sts, k3sts, yfwd, k1, yfwd, k4sts; (16sts)
Row 6: p10sts, inc, k5sts; (17sts)
Row 7: k4sts, p3sts, k4sts, yfwd, k1, yfwd, k5sts; (19sts)

Row 8: p12sts, inc, k6sts; (20sts)
Row 9: k4sts, p4sts, sl1, k1, psso, k7sts, k2tog, k1 ;(18 sts)
Row 10: p10sts, inc, k7sts; (19 sts)
Row 11: k4sts, p5sts, sl1, k1, psso, k5sts, k2tog, k1 ;(17 sts)
Row 12: p8sts, inc, k2sts, p1, k5sts; (18 sts)
Row 13: k4sts, p1, k1, p4sts, sl1, k1, psso, k3sts, k2tog, k1 ;(16 sts)
Row 14: p6sts, inc, k3sts, p1, k5sts; (17 sts)
Row 15: k4sts, p1, k1, p5sts, s1,k1,psso,k1, k2tog, k1 (15 sts)
Row 16:p4sts,inc, k4sts, p1, k5sts. (16 sts)
Row 17: k4sts, p1, k1, p6sts, s1, k2tog, psso, k1 (14 sts)
Row 18: s1, p2tog, psso, (p2tog, pass 1st stitch on right hand needle over 2nd stitch) twice, p3sts, k4sts (8 sts)
These 18 rows form the pattern, repeat them 7 times more and cast off stitches.

With wrong side of work facing, pick up and k90 sts from edge .
After assembling the cap rim , work an edge:

Finally after cap conclude, provisionally split thread I started cap, reinstate stitches on the needle and work the next edge:

In final dupa ce incheiem caciula, desfacem firul provizoriu cu care am inceput caciula , repunem ochiurile pe andrea si lucram urmatoarea margine:

Row 1: *k1, p1, repeat from* to end.
Row 2:*p1, k1, repeat from * to end.

Repeat these 2 rows 3 times more.


Another Model
"Baby Hat With Leaf Edging"


(Copyright Lauren Eade, Image Francie Owens)

 Anyway, in my picture below, the leaf edging on the right is the pattern I always found in many knitting stitch books and patterns.

But the one on the left is the one I re-wrote to face the opposite direction.

And here's my directions for it--- and it was very tricky. Because in the knitting books' pattern, the edging was an 18-row pattern with the last, 18th, row consisting of binding off 5 stitches as one part of the row.

But that could not be done in the exact same way in my re-write, so I had to add an extra row in order to do the bind-off row properly. And then I had to add an extra row so that the pattern would be on the correct side to repeat itself by starting on row 1. So if you're knitting a garment with both patterns, remember that the one I wrote has 2 extra rows, which really isn't that noticeable.

(And, in the below picture, if the first 2 leafs look scraggly, it's because I was writing as I went, and I was perfecting things, leaf by leaf, until I got it just right....)

So here's my rewrite (and it's the leaf edging on the left in the picture): Cast on 8 sts.

1. (Right Side) K2, yo, k1, yo, K5

2. K3, k 1 f & b, P 6 (Important: When doing the wrap for the "knitting into the front and back" of the stitch, wrap the first wrap as if to knit, and then for the 2nd wrap in the front make SURE you wrap from the bottom up)

3. K3, yo, k1, yo, k2, p1, k4

4. K4, K1 f & b, P8

5. K4, yo, k1, yo, k3, p2, k4

6. K5, K1 f & b, p10

7. K5, yo, k1, yo, k4, p3, k4

8. K6, k1 f & b, p12

9. K1, ssk, k7, k2 tog, p4, k4

10. K7, K1 f & b, P 10

11. K1, ssk, k5, k2 tog, p5, k4

12. K5, p1, k2, k1 f & b, p8

13. K1, ssk, k3, k2 tog, p4, k1, p1, k4

14. K5, p1, k3, k1 f & b, p6

15. K1, ssk, k1, k2 tog, p5, k1, p1, k4

16. k5, p1, k4, k1 f & b, p4

17. K1, sl 1, k2 tog, psso, p6, k1, p1, k4

18. K5, p1, k6, p2

19. P2 tog, BO 5 sts, p1, k1, p1, k4

20. k5, p1, k1, p1.


Repeat these 20 rows for pattern.

SKILL LEVEL:  Easy (Level 2)
SIZE: Varies 
2-3 (3-5) years
Finished Circumference About 17 (18 1/2) in. (43 (47) cm)
Finished Height About 11 (12) in. (28 (30.5) cm)


Gauge:

13 sts + 20 rnds = 4 in. (10 cm) over St st in the rnd (k every rnd). BE SURE TO CHECK YOUR GAUGE. When you match the gauge in a pattern, your project will be the size specified in the pattern and the materials specified in the pattern will be sufficient. If it takes you fewer stitches and rows to make a 4 in. [10 cm] square, try using a smaller size hook or needles; if more stitches and rows, try a larger size hook or needles.


HAT
Cast on 55 (60) sts. Divide sts onto 4 needles. Place marker for beg of rnd. Join by working the first st on left hand needle with the working yarn from the right hand needle and being careful not to twist sts.
Work in St st in the rnd until piece measures about 4 (4 1/2) in. (10 (11.5) cm) from beg.
Shape Top
Size 3-5 years ONLY
Note:
 If you are making size 2-3 years, do not work the next 4 rnds, go directly to the first rnd in Both Sizes section.
Next Rnd: *K10, k2tog; rep from * around - 55 sts at the end of this rnd.
Knit 3 rnds.
Both Sizes
Next Rnd:
 *K9, k2tog; rep from * around - 50 sts at the end of this rnd.
Knit 4 rnds.
Next Rnd: *K8, k2tog; rep from * around - 45 sts at the end of this rnd.
Knit 3 rnds.
Next Rnd: *K7, k2tog; rep from * around - 40 sts.
Knit 2 rnds.
Next Rnd: *K6, k2tog; rep from * around - 35 sts.
Knit 1 rnd.
Next Rnd: *K5, k2tog; rep from * around - 30 sts.
Knit 3 rnds.
Next Rnd: *K4, k2tog; rep from * around - 25 sts.
Knit 3 rnds.
Next Rnd: *K3, k2tog; rep from * around - 20 sts.
Knit 2 rnds.
Next Rnd: *K2, k2tog; rep from * around - 15 sts.
Knit 2 rnds.
Next Rnd: *K1, k2tog; rep from * around - 10 sts.
Knit 2 rnds.
Next Rnd: *K2tog; rep from * around - 5 sts.
Knit 2 rnds.
Next Rnd: (K2tog) twice, k1 - 3 sts at the end of this rnd.
Cut yarn, leaving a long tail. Thread tail through remaining sts and pull to gather. Knot securely.
FINISHING
Weave in ends.

duminică, 6 octombrie 2013

caciula tricotata model norvegian

Knittingdaily
Exploring Color Knitting 
Pattern by Freyja


Stitch Guide
Seed Stitch: (multiple of 2 sts)
Rnd 1: *1 ochi pe fata, 1 ochi pe dos*; repetam intre* pana la sfarsitul randului.
Rnd 2: *1 ochi pe dos, 1 ochi pe fata*; repetam intre * pana la sfarsitul randului.
Rep Rnds 1 and 2 for patt.
Hat
With smaller cir needle and MC, CO 120
(132) sts. Place marker (pm) and join
in the rnd. Work in seed st (see Stitch
Guide) for 1". Change to larger needle
and work Rows 1–43 of Hat chart,
changing to dpn when necessary—60
(66) sts rem. Cont with MC only as foll:
Rnd 1: Knit.
Rnd 2: *K4, k2tog; rep from *
around— 50 (55) sts rem.
Rnd 3: *K3, k2tog; rep from *
around— 40 (44) sts rem.
Rnd 4: *K2, k2tog; rep from *
around— 30 (33) sts rem.
Rnd 5: *K1, k2tog; rep from *
around— 20 (22) sts rem.
Rnd 6: *K2tog; rep from * around—
10 (11) sts rem.
Cut yarn, leaving a 10" tail. Thread tail
through rem sts, pull tight to gather,
and fasten off. Weave in loose ends.

BÉRET :
Se tricote en rond.
Monter 80-84 m avec l'aiguille circulaire 3.5 en chameau. Tricoter 1 tour end et continuer en côtes 2 m end/2 m env pendant 7 cm. Continuer avec l'aiguille circulaire 4,5, tricoter 1 tour end en chameau, en même temps, répartir 8-6 diminutions = 72-78 m. Tricoter ensuite le diagramme A-3 (= 12-13 fois le motif tout le tour). NE PAS OUBLIER DE BIEN CONSERVER LA MÊME TENSION QUE POUR L'ÉCHANTILLON !
Après A-3, il reste 36-39 m et l'ouvrage mesure environ 23 cm en hauteur. En rose, tricoter 1 tour toutes les mailles ensemble 2 par 2 à l'end = il reste 18-20 m. Couper le fil et le passer dans les mailles restantes, serrer et arrêter.
Le béret mesure environ 24 cm de hauteur.
⁄ = 2 ochiuri lucrate impreuna

0= jeteu

Modelul 2


Kate Davies Designs
Pattern dolheid


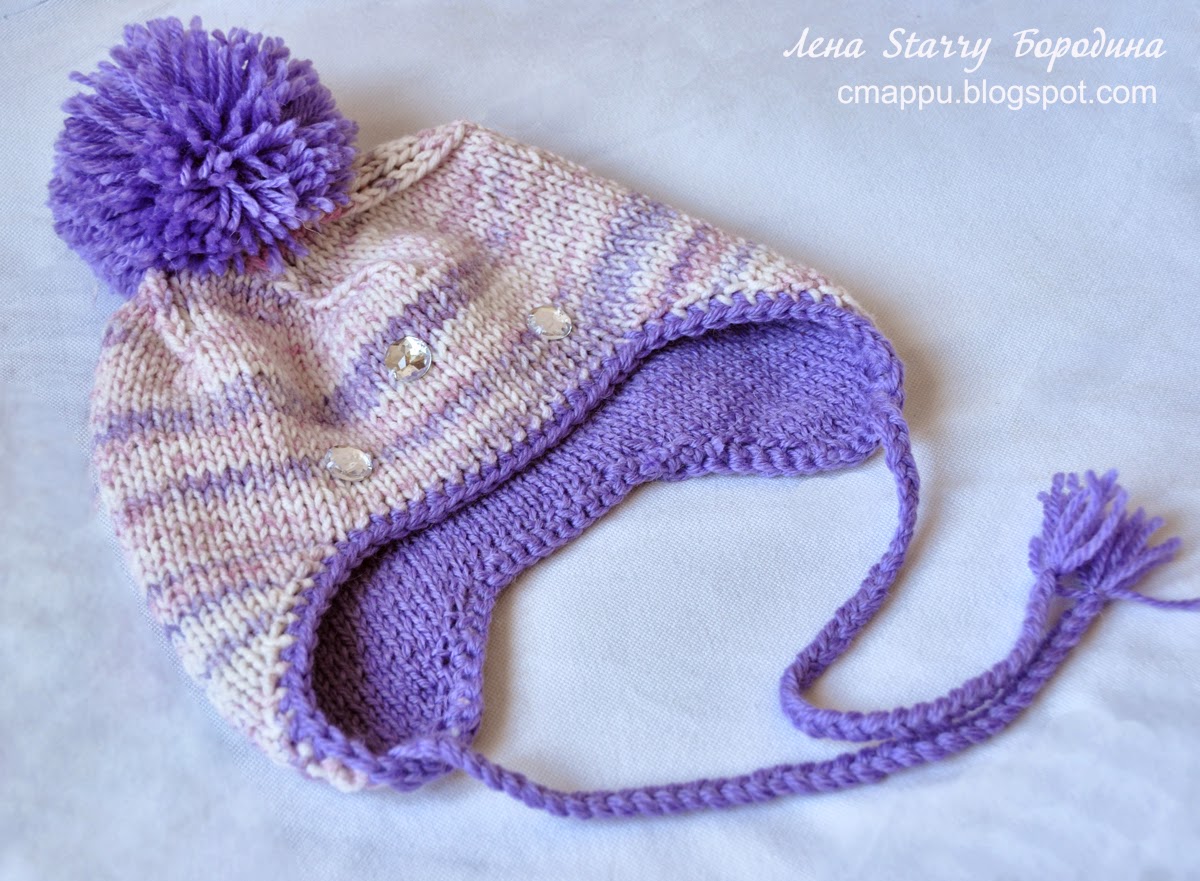
Caciula tricotata pentru copii

Caciula tricotata pentru copii
Model preluat de pe cmappu.blogspot.com
Size/Marimea= 1 an

De curand, am tricotat aceasta caciula si am constatat ca marimea rezultata nu se prea potriveste pentru un copil de 1 an. Mai degraba pentru un copil de 3 luni.
Voi reda mai jos , in paranteze , rezultatul lucrului meu.
Am tricotat cu un fir de la Phildar "Partner 3.5".
Esantion: 10 cm/10 cm = 23 ochiuri/30 randuri.
Circumferinta capului: 49 -50 cm.

Ch= 7 (11) sts  Montam pe andrea 7 (11) ochiuri

 Knit 'ear', while the top part of it will be 19 (23) loops. Thread breaks and similar knit the second "ear." The lower part of 7 (11) loops, the top 19 (23) loops
Tricotam urechile astfel: Inmultim cate 1 ochi la fiecare sfarsit de rand :
Row1: k1 , k5  (k9),  M1L,  k1  (8  (12) sts)
Row2:  k1,  k6 (k10),  M1L, k1  (9  (13) sts)
Row 3:  k1,  k7 (k11), M1L, k1 (10  (14) sts)
Row 5:  k1,  k8 (k12), M1L, k1 (11  (15) sts)
Row 7:  k1,  k9 (k13), M1L, k1 (12  (16) sts)
Row 9:  k1,  k10 (k14), M1L, k1 (13  (17) sts)
Row 10:  k1,  k11 (k15), M1L, k1 (14  (18) sts) 

Row 11:  k1,  k11 (k15), M1L, k1 (15  (19) sts)
Row 12:  k1,  k11 (k15), M1L, k1 (16  (20) sts)
Row 13:  k1,  k11 (k15), M1L, k1 (17  (21) sts)
Row 14:  k1,  k11 (k15), M1L, k1 (18  (22) sts)
Row 15:  k1,  k11 (k15), M1L, k1 (19  (23) sts) 

K= knit= ochi pe fata
p= purl = ochi pe dos
M1L=make 1 stitch=   inmultim 1 ochi spre stanga


https://www.youtube.com/watch?v=gGbOiIvWLjc

Repeat between *= Repetam intre *.

Where the thread is not broken added 10 (16) stitches, then , continue to knit the other 19 (23) sts

Pe una din andrele adaugam 10 (16) ochiuri si continuam sa tricotam cele 19 (23) ochiuri dupa a doua andrea.


knit 19 (23) sts, then CO 10 (16) sts, knit 19 (23) sts in st st.
Increase 1 st at each end of the row . - 16 sts, then increase CO 8 sts (to form rounded headpiece).
Apoi, tricotam 19 (23) ochiuri, dupa care adaugam 10 (16) ochiuri (partea din spate) si continuam sa tricotam cele 19 (23) ochiuri de pe a doua andrea.
Inmultim cate 1 ochi la fiecare sfarsit de rand ,  (total 16 (28) ochiuri), apoi,  adaugam odata 8(16) ochiuri, pentru a forma rotunjimea caciulei..De aici, unim primul si ultimul ochi si tricotam circular.

Knit in round  with dpn needle 72 sts, at least 19 times.  (19 sts X 2 +10 sts back +16 sts -face + 8 sts -  rounded headpiece  )
Tricotam circular pe ace cu doua varfuri, 
Vom avea 72  (127) ochiuri : 19 (23) ochiuri X 2  + 10 (16) ochiuri (spate) + 16 (28) ochiuri. (față) + 8 (37) ochiuri. (rotunjimea din față ).

Begin Decrease:
 work 12 sts, place marker (across) 
work 10 sts, work 2 sts together
work 9 sts, work 2 sts together
work 8 sts, work 2 sts together
work 7 sts, work 2 sts together
work 6 sts, work 2 sts together
work 5 sts, work 2 sts together
work 4 sts, work 2 sts together
work 3 st, work 2 sts together 
 work 2 sts, work 2 sts together 
 work 1 sts, work 2 sts together 
 Leave remaining sts on DPNs, cut a 8" tail from your working yarn. Using your large eye yarn needle, pick up remaining sts off DPNs (in circular order - just as if you were working them) and pull tight; run tail through to the inside of the hat and tie off.
 Incepem sa scadem  pentru a incheia caciula. Impartim numarul ochiurilor la 6  si vom 
Incepem sa scadem pentru a finaliza caciula.
Impartim numarul total de ochiuri la 6 si plasam cate un marker sau un fir de ata colorat.
Se lucreaza tot circular si vom scadea cate 1 ochi dupa fiecare marker. 
Vom scadea cate 6 ochiuri pe fiecare rand.

lucram 12 (19) ochiuri, plasam marker (x 6) 
lucram 10 ochiuri , lucram 2 ochiuri impreuna pe fata
lucram 9 ochiuri , lucram 2 ochiuri impreuna pe fata
lucram 8 ochiuri , work 2 sts together
lucram 7 ochiuri , lucram 2 ochiuri impreuna pe fata
lucram 6 ochiuri , lucram 2 ochiuri impreuna pe fata
lucram 5 ochiuri , lucram 2 ochiuri impreuna pe fata
lucram 4 ochiuri , lucram 2 ochiuri impreuna pe fata
lucram 3 ochiuri , lucram 2 ochiuri impreuna pe fata  
  lucram 2 ochiuri , lucram 2 ochiuri impreuna pe fata  
  lucram  1 ochi,  lucram 2 ochiuri impreuna pe fata  
Taiem firul si-l scoatem prin ochiurile ramase, strangem si coasem.
Adaugam apoi, pompom-ul.

Similarly, the second knit cap - because it will be outside, then increase the number of loops everywhere by 2 (sts).
Tricotam similar si a doua caciula si deoarece aceasta va fi în exterior (deci va fi un pic mai mare), vom crește numărul de ochiuri peste tot cu 2 ochiuri.
With a crochet hook and a contrasting thread, join the two parts. You added a large pompom.
Cu o croseta si un fir contrastant, unim cele doua parti, apoi, adaugam un pom- pom .

Un alt model de caciula.


In acest videoclip, incepem caciula din varful capului.
Doua procedee diferite cu acelasi rezultat.